Buying help desk software is one thing—but getting the help desk setup right is another.
I learned this the hard way a few years ago when my team switched to a new support tool, thinking it would instantly solve our ticket chaos. Instead, we spent weeks untangling missed emails, confused agents, and unhappy customers—all because we hadn’t set it up strategically.
That experience taught me something every entrepreneur eventually learns: a help desk is only as powerful as its setup. When configured the right way, it can transform your support operations, improve response times, and even boost customer loyalty.
I’ll walk you through everything you need to create a modern, efficient, and AI-powered help desk—from configuring your inbox to automating workflows and empowering your agents with data-driven insights.
Key Considerations Before Help Desk Setup
Before you dive into help desk setup, it’s important to plan beyond the basics. Many businesses focus only on adding agents or configuring inboxes, but bigger factors like costs, integrations, and scalability can make or break long-term success. Here are the essentials to think about:
| Factor | What to Decide | Why It Matters |
|---|---|---|
| Goals & Metrics | Define success: faster response times, higher resolution rates, fewer backlogs, better CSAT, and aligning support with customer expectations. | Helps track performance while ensuring customers feel heard and valued. |
| Budget | Estimate licensing, onboarding, training, integrations, and ongoing costs. Ask about hidden fees. | Prevents surprise expenses and ensures scalability. |
| Integrations | List current tools (CRM, chat, phone, HR, etc.) and check compatibility. | Avoids silos and duplicate work. |
| Migration | Decide what data to migrate from old systems and test for accuracy. | Prevents data loss and agent frustration. |
| Scalability & Security | Ensure the system can grow with your team and meet compliance needs. | Saves you from costly changes later. |
| Training | Plan structured onboarding and ongoing training for agents, including tool usage, workflows, and customer interaction guidelines. | Well-trained teams adapt faster, resolve issues better, and maintain consistency in service. |
Customer Expectations From Modern Help Desk Setup
Customers today expect quick replies, clear updates, and personalized interactions. They also want the option to help themselves through FAQs or knowledge bases before reaching out to support.
When planning your help desk, make sure speed, transparency, and self-service are built into your workflows. Meeting these expectations from the start sets the tone for a better customer experience.
How to Set up Help Desk in 7 Easy Steps
Setting up a help desk doesn’t have to feel overwhelming. Here’s a step-by-step breakdown to guide you through the process.
Step 1: Configure Your Inbox
Help desk inboxes are designed to help you combine all your existing customer-facing team inboxes (Such as support@, returns@, contact@, etc.) in a single platform. This way, all important customer communications can be forwarded to a shared dashboard, so you never miss out on an important message.
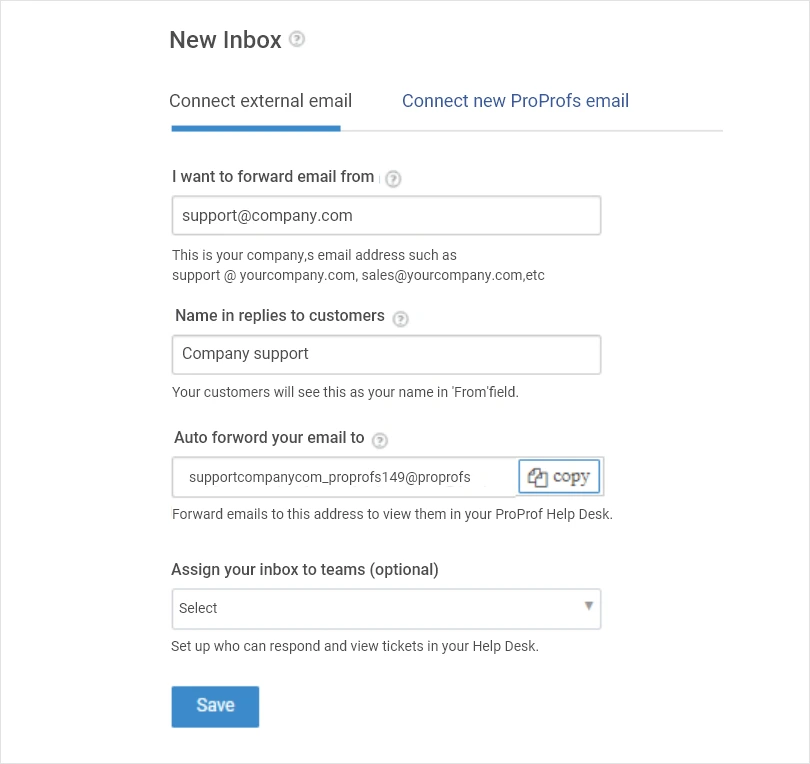
To add a new email account, navigate to Settings > Inboxes. Click + New Inbox.

Simply enter the email address (support@company.com) from which you wish to forward customer emails to your help desk inbox. In the second text box, enter the name that the customer will see. For example, for a Customer Support inbox, you can simply use the name ‘Customer Support.’
Step 2: Customize Your Help Desk & Add Branding
Make your help desk feel like an extension of your business, not just another generic platform.
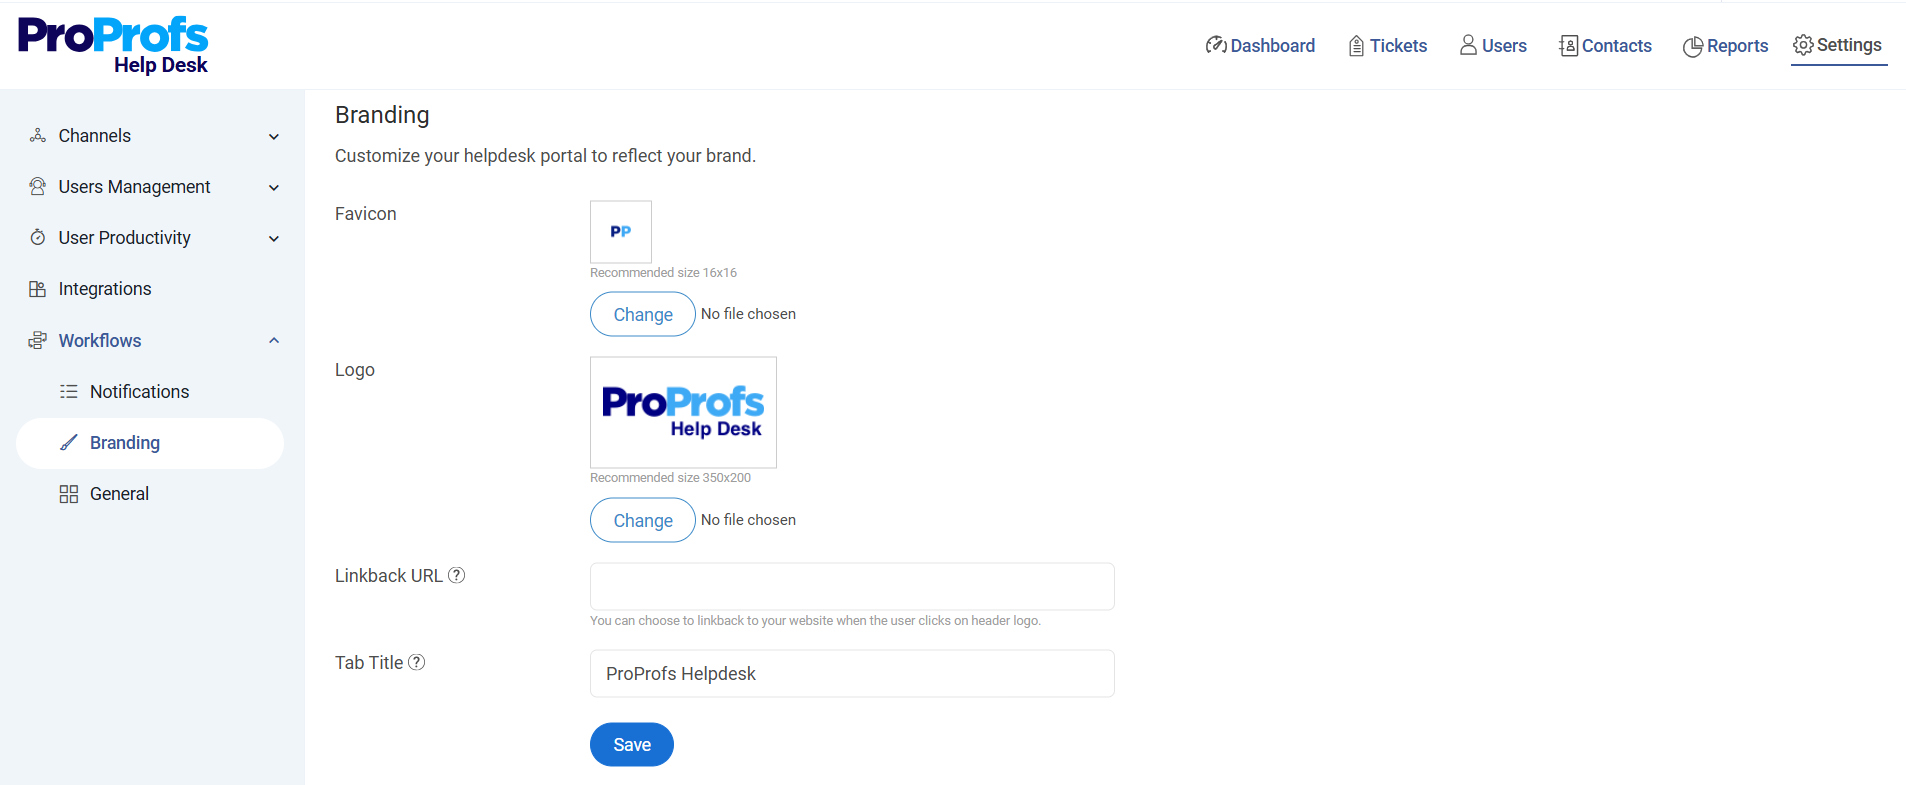
- Add your company logo, colors, and branding elements.
- Customize outgoing email templates to reflect your tone and style.
- Update the customer portal with your business name, links, and helpful resources.
Step 3: Add Agents to Your Help Desk Account
Once your inbox is ready, it’s time to add your support squad, or in other words, your agents who are responsible for resolving support tickets. To add a user, navigate to Settings > Users Management > Users. Click on the +New User button.
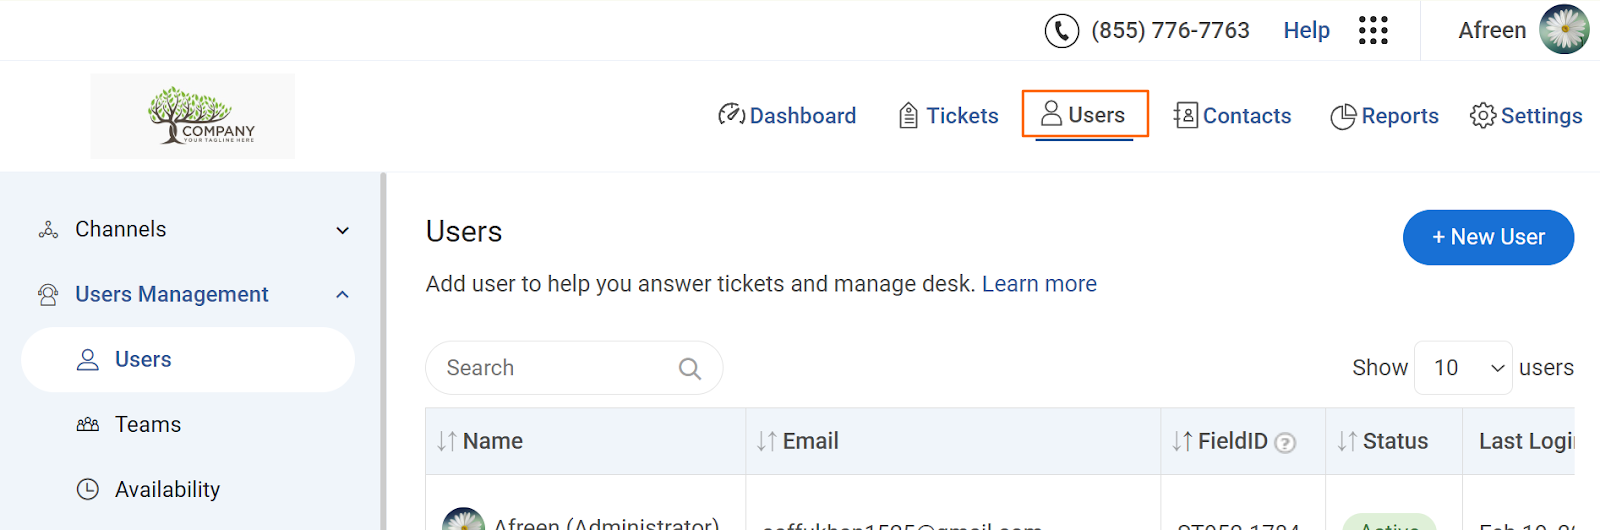
You will be redirected to the ‘Add a New User‘ form, where you can add details like agent name, email, and phone number. You can also assign a relevant team and roles (Staff, Manager, or Admin) to agents based on their experience and expertise.
Roles permit various levels of access to the help desk. A practical help desk example is an administrator reviewing reports and addressing tickets within the platform.
Step 4: Automate Ticket Assignment & Workflows
Automation prevents bottlenecks and ensures tickets never slip through the cracks.
- Set rules for auto-assigning tickets based on agent workload.
- Configure workflows for escalations, SLAs, and follow-ups.
- Automate repetitive tasks such as sending notification emails.
Step 5: Create a Knowledge Base for Self-Service
Many customers prefer finding answers on their own before contacting support. A knowledge base helps reduce ticket volume while empowering users.
- Build FAQ articles, troubleshooting guides, and “how-to” content.
- Organize content into categories for easy navigation.
- Link KB articles directly in responses for faster resolutions.
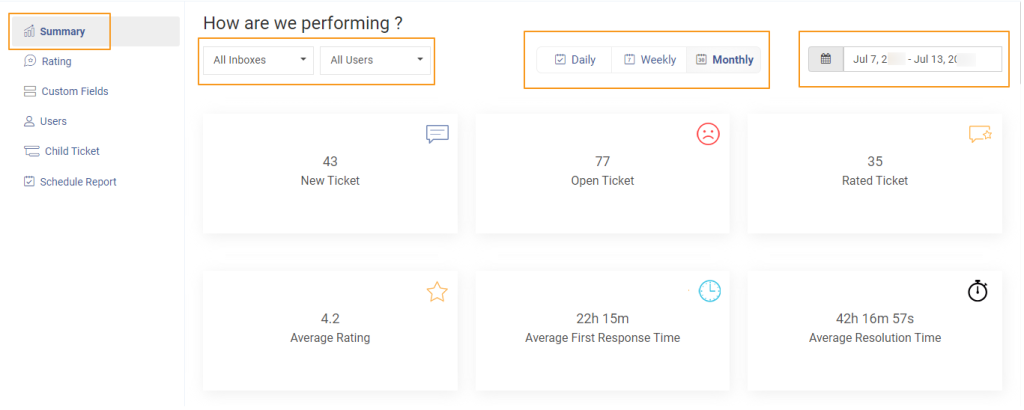
Step 6: Set Up SLAs & Reporting Dashboards
Service Level Agreements (SLAs) define clear response and resolution timelines. Pairing them with dashboards keeps performance transparent.

- Configure SLA policies for first response times, resolution times, etc.
- Set alerts for SLA breaches so nothing slips.
- Use reporting dashboards to monitor performance metrics, resolution time, CSAT, and backlog.
Step 7: Enable Help Desk Integrations
Your help desk shouldn’t exist in a silo. Connect it with the tools your business already uses:
- CRM for customer history and sales alignment.
- Chat & social tools for omnichannel support.
- Project management tools for cross-department collaboration.
- Email marketing or survey tools for customer feedback.
Key Considerations After Help Desk Launch
Getting your help desk live is a big milestone, but the real work begins after launch. This is when you see how well your setup performs with real customers and tickets.
1. Monitor Performance Against SLAs
Once your help desk is live, start keeping an eye on whether your response and resolution times match the promises you’ve made in your SLAs. If you notice frequent delays or breaches, that’s a sign your workflows need adjusting.
Customers expect quick answers, and even small delays can hurt trust, so reviewing these numbers regularly helps you stay on track.
2. Collect Continuous Customer Feedback
Don’t wait until complaints pile up before asking customers how they feel. Use help desk satisfaction surveys to get quick feedback after each interaction.
This helps you understand not only whether issues were resolved but also how customers felt about the experience. The more you listen, the more chances you have to improve.
3. Review Agent Workload & Training Needs
It’s easy for some agents to get stuck with more work than others once tickets start rolling in. Check if workloads are balanced and see if anyone needs extra support. If you spot gaps in knowledge or processes, arrange refresher training.
Well-equipped agents resolve issues faster and deliver a smoother customer experience.
4. Update & Expand Your Knowledge Base
Your knowledge base isn’t a “set it and forget it” resource. Over time, customers will run into new questions, and your products or services may change. Keep adding fresh content, update outdated articles, and make sure everything is easy to find.
A strong knowledge base means fewer repetitive tickets and happier customers who can solve problems on their own.
5. Audit Automation Rules & Workflows
The automation rules you set before launch may not work perfectly once real tickets come in. Review your routing, auto-responses, and escalation rules to see if they still make sense.
Adjusting these workflows based on actual customer behavior ensures that tickets are resolved quickly and don’t get lost along the way.
6. Evaluate Cost & Scalability
After launch, compare your current usage with your budget and subscription plan. Are you paying for features you don’t use? Do you need more agent seats or advanced reporting as volume grows?
Keeping an eye on costs while planning for future needs makes sure your help desk continues to support your business without becoming too expensive.
7. Strengthen Security & Compliance
As your team grows, roles may change, and permissions need updating. Regularly check who has access to sensitive data and confirm that your setup aligns with compliance requirements like GDPR or HIPAA if they apply.
Customers trust you with their information, and keeping their data safe is one of the most important parts of running a reliable help desk.
FREE. All Features. FOREVER!
Try our Forever FREE account with all premium features!
Integration & Migration: Common Challenges & How to Overcome Them
Setting up a help desk system isn’t just about switching on a new tool. The real challenge comes when you have to integrate it with existing software and migrate data from older systems. Done poorly, this stage can cause data loss, frustrated agents, or costly delays. Below are the most common challenges businesses face and how you can overcome them.
1. Data Loss or Corruption
When migrating from email inboxes, spreadsheets, or an older help desk system, there’s always a risk of losing important customer history. If ticket IDs don’t match, attachments fail to transfer, or fields aren’t mapped properly, the data could be corrupted.
How to overcome it:
- Take full backups before migration.
- Run a trial migration with a sample set of tickets and validate results.
- Work closely with the vendor’s support or use migration tools that handle field mapping automatically.
- Always test migrated data before going live.
2. Cost Overruns
Many teams underestimate the true cost of help desk setup. Beyond licensing fees, there can be hidden charges for additional agent seats, advanced features, integrations, or premium support. Custom API integrations can also inflate the budget.
How to overcome it:
- Ask vendors to share a full breakdown of costs, including “nice-to-have” features.
- Compare pricing models (per agent vs. per ticket vs. tiered plans).
- Forecast future costs as your team scales, so you don’t end up locked into an expensive plan.
3. Downtime & Service Disruption
Switching systems often cause temporary downtime where tickets may not get logged or routed properly. Even a few hours of disruption can hurt customer trust and frustrate internal teams.
How to overcome it:
- Schedule migration during low-volume periods (weekends or holidays).
- Keep your old system in read-only mode for reference until the new one stabilizes.
- Clearly communicate with your team—and if needed, with customers—about expected downtime.
- Test workflows in a sandbox environment before launch.
4. Resistance to Change
Agents and managers who are used to the old way of working may resist switching to a new system. This can lead to under-utilization of features, errors, or slow adoption.
How to overcome it:
- Involve your support team early in the selection and setup process.
- Appoint “internal champions” who can guide others.
- Provide step-by-step training and short refresher sessions instead of a single long one.
- Launch in phases (e.g., start with email tickets, then add chat or social).
5. Integration Gaps
Your help desk should ideally integrate with different tools like your CRM, chat, phone, invoicing, HR, or knowledge base. But sometimes, critical tools aren’t supported, forcing teams into duplicate data entry or manual workarounds.
How to overcome it:
- Audit your existing tool stack before setup and identify must-have integrations.
- Choose software with strong native integrations or open APIs.
- For complex setups, consider middleware (like Zapier, Make, or custom connectors).
- Test every integration in a live environment before rollout.
Pro Tip: Always allocate extra time in your project plan for integration and migration. While setup guides often promise “instant configuration,” real-world teams usually need 2–4 weeks to test data accuracy, configure integrations, and train agents.
Test Your Help Desk Setup
For a final help desk testing, you can create a ‘sample customer email account’. Use that email account to share a couple of issues and ask your team to address them. You can test the following aspects:
- Check if you receive any notification once a customer email is received.
- Test if you are able to assign tickets to relevant agents or teams. Ask your team to get another department involved (such as sales or marketing) to resolve an issue.
- Check if you are able to attach links to your knowledge base content (blogs, self-help guides, videos, etc.)
- Check the report section and see how much time it took to share a response to the ‘test emails.’
Once you test all the nitty-gritty of a help desk and other crucial features discussed in this blog, you will be prepared to handle a huge chunk of customer issues.
Congratulations! You are now ready to offer awesome support.
Begin Your Help Desk Journey Today!
By following these steps, you’ll know exactly how to set up help desk support in a way that serves both your team and your customers. A thoughtful setup means faster responses, smoother workflows, and measurable improvements in satisfaction.
The right system doesn’t just reduce chaos—it creates an organized support process that scales as your business grows. ProProfs Help Desk, one of the best help desk software options, makes this even easier with a Gmail-like interface and powerful automation features, so resolving issues feels familiar and efficient.
Frequently Asked Questions

What are the essential features to look for in help desk software?
AI-powered ticketing, automation, multichannel intake, a knowledge base, and reporting are the core. These help you route requests fast, enable self-service, and measure performance.
Should I choose a help desk or a service desk?
A help desk focuses on reactive support and ticket resolution. A service desk covers a wider ITSM scope like service delivery and operations. Choose the scope that matches your needs. You can read this blog to learn more about help desk vs. service desk.
Can one help desk support multiple teams or brands?
Yes. Look for roles and permissions, departments or groups, and multi-channel or multi-brand options so you can grow without retooling.
How do I create a helpdesk system for my business?
Start with inbox setup, add agents, set roles, then add automation, SLAs, and a knowledge base. These steps create a system that grows with your business.
How to set up help desk support that scales
Focus on integrations, automation, and reporting dashboards. A scalable help desk setup ensures you can handle rising ticket volumes without losing quality.
FREE. All Features. FOREVER!
Try our Forever FREE account with all premium features!
 We'd love your feedback!
What did you like & how can we make it even better?
 Thanks for your feedback!
 Ask Your Question
Have a question? Get expert help to make your decision easier.